Part 3 ended with the lab hardware complete — the nRF52840 sniffer watching passively, the Realtek adapter ready to participate. The natural next question was: now what do I actually do with it?
Up until now I'd been learning how to use tools other people built — Nordic's nRF Sniffer, Wireshark, tshark, bluetoothctl. Useful tools, genuinely excellent tools. But at some point the real learning comes from building your own. This session was that point.
Setting Up the Environment
Rather than adding code to an existing project, I created a completely separate development environment:
~/projects/bluetooth-lab
A dedicated Python virtual environment keeps the project isolated — dependencies can evolve independently without affecting anything else on the system:
python3 -m venv venv
source venv/bin/activate
This is one of those habits that feels like overkill until the day you're glad you did it.
Installing Bleak
The first library installed was Bleak — a cross-platform Python library for Bluetooth Low Energy that uses Linux's BlueZ stack underneath. The thing that made it click was understanding the full stack:
↓
Bleak
↓
dbus-fast
↓
BlueZ
↓
Bluetooth Adapter
Knowing exactly where Python sits in that chain makes it much easier to reason about what's going wrong when something doesn't work.
First Scanner
The first version of PixelScope did one thing: scan for nearby Bluetooth devices. That's it. No filtering, no analysis, just a list:
Scanning for Bluetooth devices...

Found 19 device(s)

EE:91:61:80:AE:06
ZOMBIE-PC
LEDnetWF010033D80304
...
Basic as it is, this proved something important — Python was successfully talking to the Realtek Bluetooth adapter. That's the first working version of any piece of software: the moment it does the smallest useful thing correctly.
A Modern API Lesson
Adding RSSI support hit an interesting snag. Most examples online do something like this:
signal_strength = device.rssi
That fails. RSSI is no longer stored directly on the BLEDevice object in modern Bleak. The current API uses return_adv=True during the scan, which returns both the device and its advertisement data as a pair. RSSI lives on the advertisement:
advertisement.rssi
Naming It
At this point the project got its name: PixelScope. Bluetooth Research Platform. With the Glitched Pixel slogan baked into the header because of course it does.
👻 PixelScope
Bluetooth Research Platform
CAN'T STOP THE SIGNAL
Naming a project matters more than it sounds. It stops it being "that Python script" and starts it being something with an identity and a direction.
Rich Terminal UI
Instead of plain print() output I added the Rich library for coloured panels, formatted tables, and consistent styling. The immediate practical benefit is that RSSI values are now colour-coded — green for strong signal, yellow for medium, red for weak — making it much easier to spot which devices are nearby versus which ones are just noise from a few rooms away.
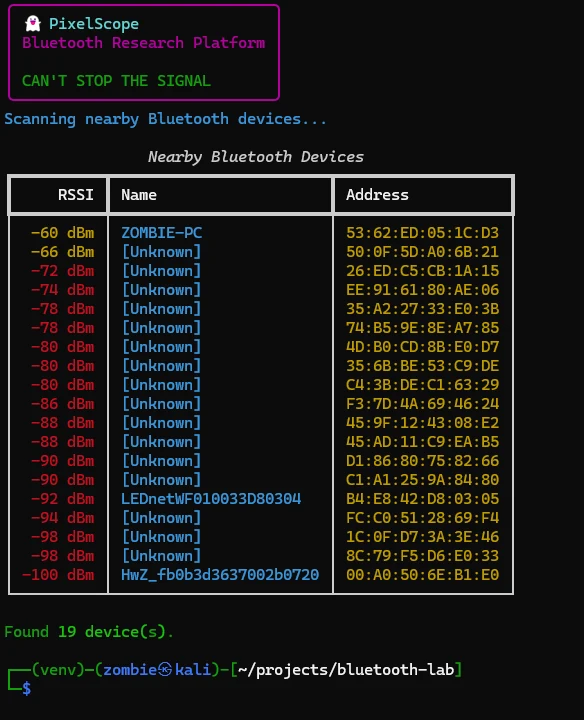
The Rich panel layout — this is starting to look like actual software rather than a debug script.
The jump from plain text output to a proper terminal UI is dramatic. It changes how the tool feels to use, and more importantly it changes how it feels to work on. Software that looks like software is easier to keep improving.
Where This Is Going
PixelScope has moved beyond being "a Bluetooth scanner." The long-term vision is a complete wireless research platform that brings together all the tools I use in the lab under one consistent interface. Planned modules: